We have moved to our new Virtual home! The kitchen is fabulous and the food even better.
Come and visit us at http://thesteamingpot.com/.
PS. If you are subscribing to the blog, don't forget to update the feed to feed://thesteamingpot.com/feed/.
25 April 2010
23 April 2010
In with the greens!
After a long, cold and dark winter, the spring seems to make an appearance slowly! First the blue skies, then the blossoming flowers and of course the delights of the longer days.
As the winter blues are going away our diet changes too. Its time for some greens and lighter dishes.
A lovely Spinach Pie came to mind after a friend asked for the recipe. The spinach pie reminds me of home as my mum is the queen of pies, since she owns a shop where she makes pastries as such.
The recipe I make is a slightly altered version of my mums recipe. The reason of alteration is that I do find that the spinach I can get here in the UK is rather bland in taste, so I need to give the recipe some extra flavours. Thats where my lovely leeks come in handy. Not a spring vegetable but helps!
Spanakopita - spinach filo pastry pie
1 bunch of spring onions
500gr frozen spinach
2 medium size leeks - avoid the huge ones they are just bitter and we need sweetness
1 bunch of fresh dill
2 eggs
1 block of feta cheese
1 packet of Filo Pastry
2 cups of olive oil
salt pepper to taste


Your pie should look like this!

As the winter blues are going away our diet changes too. Its time for some greens and lighter dishes.
A lovely Spinach Pie came to mind after a friend asked for the recipe. The spinach pie reminds me of home as my mum is the queen of pies, since she owns a shop where she makes pastries as such.
The recipe I make is a slightly altered version of my mums recipe. The reason of alteration is that I do find that the spinach I can get here in the UK is rather bland in taste, so I need to give the recipe some extra flavours. Thats where my lovely leeks come in handy. Not a spring vegetable but helps!
Spanakopita - spinach filo pastry pie
1 bunch of spring onions
500gr frozen spinach
2 medium size leeks - avoid the huge ones they are just bitter and we need sweetness
1 bunch of fresh dill
2 eggs
1 block of feta cheese
1 packet of Filo Pastry
2 cups of olive oil
salt pepper to taste

Instead of frozen spinach you can use fresh but you will need 1kg as the frozen one is already partly cooked so half of the moisture is gone. Before you start you recipe thaw your spinach in a colander so the juices can leave and that reduces the cooking time needed
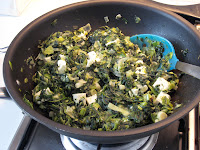
Heat a pan with some olive oil. Chop the leeks and the spring onions and through in the pan so they start sweating.
Once that is done through in the spinach and cook all the greens till the liquid that came out of the spinach is gone.
Before you are ready to turn of the heating put some salt and some pepper and the finely chopped dill. Herbs at the end so they keep the full flavour. If you wish you can also add a table spoon of finely chopped mint but this is not really part of my recipe.
As I mentioned above, the leeks are not part of the original spanakopita. But they do add sweetness and flavour. We do actually make another pie solely with leeks instead of spinach.
Leave the mixture to cool down and that also gives you time to see if there is any liquid left. If there is you can put some fine semolina to thicken it. The semolina will pick the liquid and expand and also give more volume to the mix. Add the two eggs and the feta cheese which you either crumbled or diced and mix.
I mentioned to wait till the filling is cold because if its too hot the eggs will possible cook and the cheese will melt and you want that to happen in the over not in your pan!

Now it time for the filo pastry to go in the tray. In this occasion I found pastry in an Arab super market and that is for Baclava and this one is drier thinner and stays more crunchy. Brush some olive oil to cover all the tray and lay your first filo to cover the one side, brush with oil and add the next one. You need to make sure that every part of the tray is covered with pastry and every sheet is brushed with oil before you add the next one on top
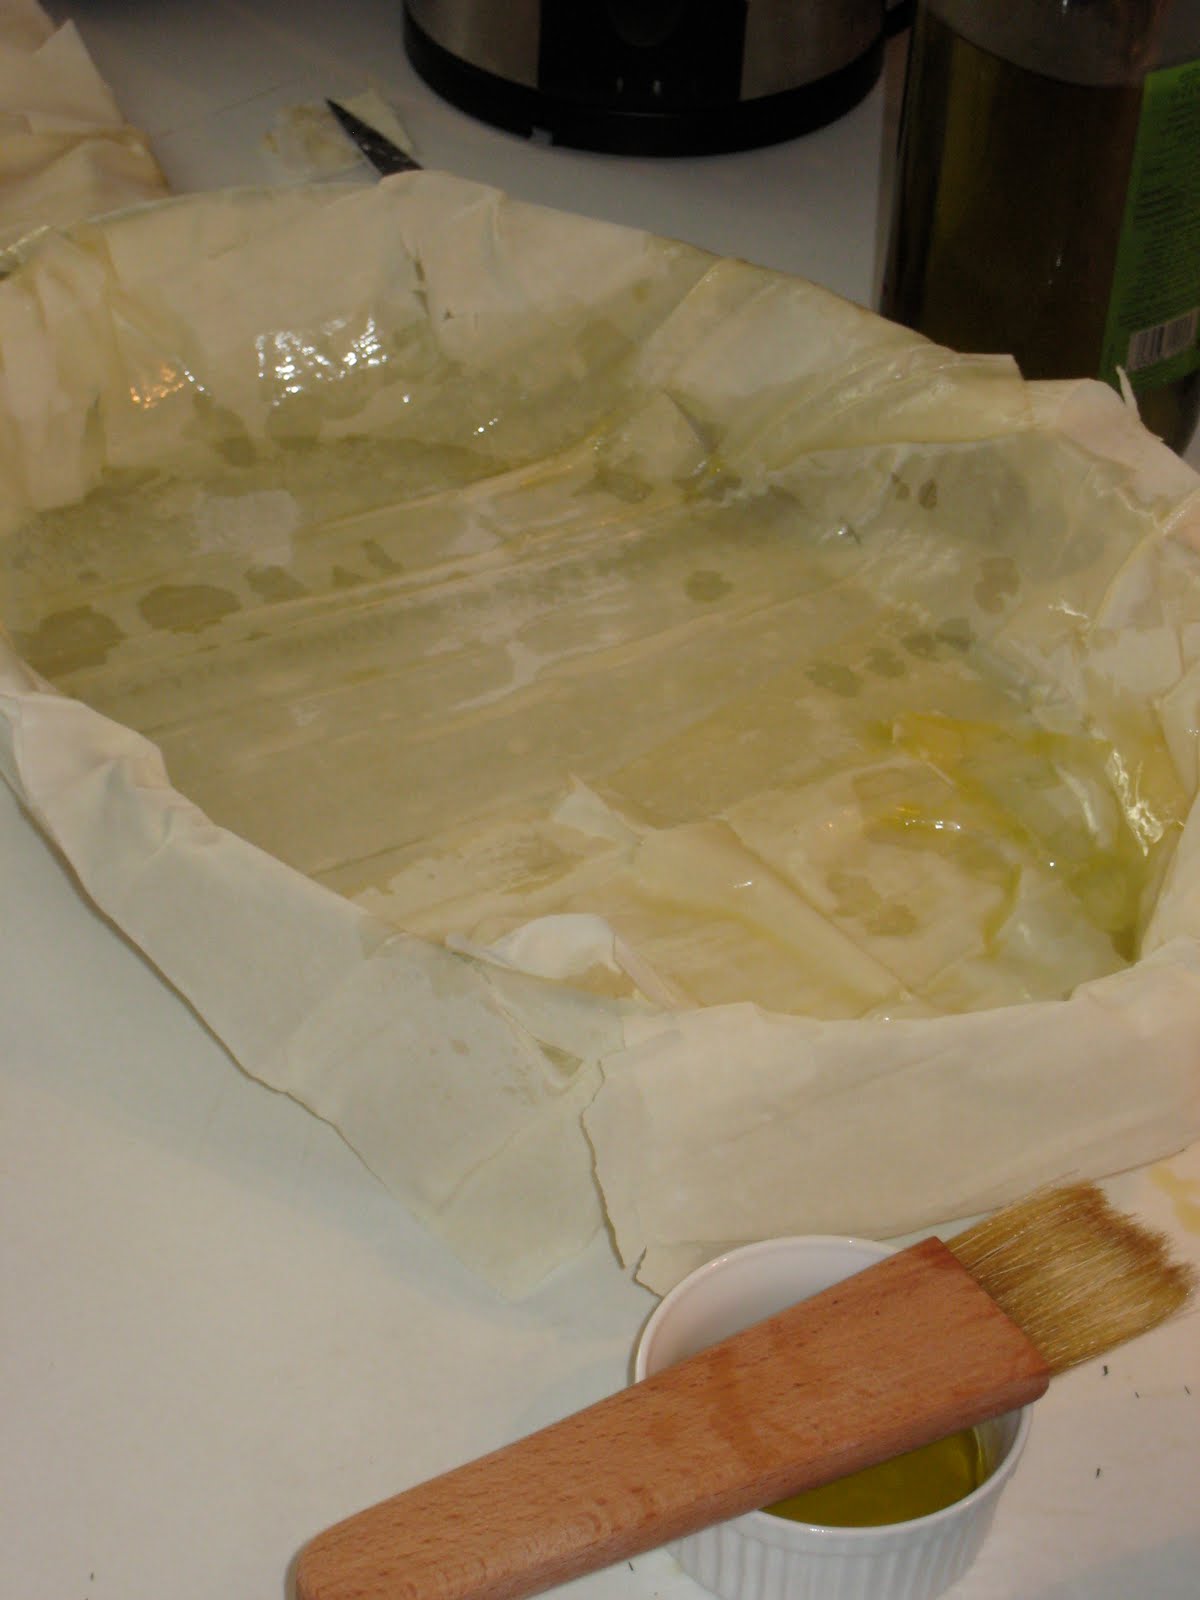
Layer about half of the pastry you have and then add the filling as by this time it would have cooled down.

Finally add the last of your pastry, one sheet at a time and make sure that you do not forget to brush with oil. All the pastry that was hanging from the rim of the tray can go on top now as you can see on the photos below. The remaining oil can be mixed with some water and poured on top of the pie.
The water helps the pastry to be more crunchy!

 Preheat the oven to 170°C -330°F and place the pie in the middle of the oven. If you have fan assisted oven place it on the setting up and down heat and fan.
The pie should cook for about 40-50 minutes till its golden on top and bottom. I used a pyrex dish that helped me see if the bottom is cooked as I haven't made a pie in this oven before.

Your pie should look like this!

You can serve it cold, warm, straight from the oven, for breakfast or dinner, on its own or with a dollop of Greek Yogurt on the side. The ultimate greek way would be with a glass of chocolate milk! (www.milko.gr)
No matter how you serve it, make sure you share it and enjoy it!!
07 April 2010
The Feast of all Feast
As the late Keith Floyd said on his trip to Corfu, the Greek Easter is "..the Feast of all Feasts". And he was right.
If there is one day in the year that is more important of all, religiously and culinary, is Easter Sunday.
After 40 days of lent and the strictly vegetarian diet, that the Greek Orthodox people usually follow during that period, Easter Sunday is an endless feast of meat and rich food!

For this blog I will include the recipe for the Easter soup we eat (Magiritsa) which includes mainly offal and I will also add some photos from the preparation. I will add a second blog with the roasted lamb and some dips/salads that we usually have on the Greek table.
I am sure that many people will find the soup something out of a horror book... but I can assure you that I have found similar dishes in many cultures. It is of an acquired taste I admit, but for me this soup is what screams "Easter in Greece" more than anything! This recipe has many variations but that is what I am used to from home.
Here it goes!
It is usually made for at least 6 people as the Easter lunch or dinner is a family affair and the more the merrier!
Magiritsa
Ingredients
1-1,2 kg lamb offal
This includes hearts, liver, kidneys, sweetbreads anything offal. I used a heart and liver and kidneys.
We use lamb as this gives the true taste of Easter.
Picture not included for these ingredients for people with a sensitive disposition. But if you feel sick even with the thought of offal please stop reading now!
 2 big Romaine lettuces
2 bunches of spring (salad) onions
a bunch of dill
olive oil
salt, pepper to taste
 And here is how it should look like. Now you have 3 options for the finishing touches. You can just add lemon, make lemon sauce or Augolemono which is a lemon sauce with egg. The way I listed the options, goes from light to heavier!
Augolemono sauce
1 large egg,
2 lemons,
liquid from the soup

If there is one day in the year that is more important of all, religiously and culinary, is Easter Sunday.
After 40 days of lent and the strictly vegetarian diet, that the Greek Orthodox people usually follow during that period, Easter Sunday is an endless feast of meat and rich food!
Kalo Pascha

For this blog I will include the recipe for the Easter soup we eat (Magiritsa) which includes mainly offal and I will also add some photos from the preparation. I will add a second blog with the roasted lamb and some dips/salads that we usually have on the Greek table.
I am sure that many people will find the soup something out of a horror book... but I can assure you that I have found similar dishes in many cultures. It is of an acquired taste I admit, but for me this soup is what screams "Easter in Greece" more than anything! This recipe has many variations but that is what I am used to from home.
Here it goes!
It is usually made for at least 6 people as the Easter lunch or dinner is a family affair and the more the merrier!
Magiritsa
Ingredients
1-1,2 kg lamb offal
This includes hearts, liver, kidneys, sweetbreads anything offal. I used a heart and liver and kidneys.
We use lamb as this gives the true taste of Easter.
Picture not included for these ingredients for people with a sensitive disposition. But if you feel sick even with the thought of offal please stop reading now!

2 bunches of spring (salad) onions
a bunch of dill
olive oil
salt, pepper to taste
We chop all the offal into bite size chunks. You can ask your butcher to do it for you. Since offal is not the easiest thing to find in this country order from a good butcher well in advance!! The Foodhall in Selfridges has a fabulous butcher, a bit on the pricier side but great quality and they do offal which is fantastic. Borough Market is good too on Saturdays, Tuesdays and Fridays, although I found that liver costs more than fillet there, so I did not leave my custom (£24 per kilo).
You need to brown the meat with some olive oil in a big pot.
Once this is done, you need to pour water to cover the meat and start boiling. Remove the foam that will be created on the top with a slotted spoon.
After about 40 minutes of gentle boiling (top up with water -its a soup after all) chop your greens ready to be added in the soup. Small chunks of onions, roughly chopped lettuce.
Add them at once but wait for the dill to be added almost at the end.
The greens need to be cooked for another 15 minutes at least and then you can add the finely chopped dill.
Continue to cook for another 10 minutes and add the olive oil at the end and take off the heat. The oil should not be much, about two espresso cups.
 And here is how it should look like. Now you have 3 options for the finishing touches. You can just add lemon, make lemon sauce or Augolemono which is a lemon sauce with egg. The way I listed the options, goes from light to heavier!
 Augolemono sauce
1 large egg,
2 lemons,
liquid from the soup
(The egg can be replaced with corn flour to make it lighter and create a basic white lemon sauce.)
Beat the egg, start pouring the juice of the lemon. Then take some of the liquid from the soup.
Do not use boiling liquid that will cook your egg to a lemony omelette ...
Gently combine all the liquid whilst whisking, add more of the soup liquid.
Once the mix is smooth and no curdles have been formed pour into the soup and bring to the boil. Do not forget to stir the soup to avoid curdling.
You can add less or more lemon according to taste.
Serve immediately and let the Easter Feast begin!!
Kali oreksi!

05 March 2010
Sweet Traditions
Sunday is the day that people traditionally have a rest, enjoy their family and worship God! As the new weekend on its way I can't stop thinking of the wonderful weekend we had last week. I have to admit it was very Greek orientated and very religious.
This posting will be "Part 1 - Saturday", of last weekend's eating and cooking.
On Saturday we had a Holy Blessing for the house. It is an old Greek Orthodox custom that when you move to a new house you invite some friends and a priest (in our case we had 2 priests) and the priest performs a ceremony where he reads some blessings for the house and then sprinkles Holy Water all over the corners of the house. I know that might sound a bit odd to some people, but I guess that's the simplest way to explain what a Holy Blessing is and for me it was a need I had, since we moved to London.
Since it is Lent, the 40 day period before Easter, I had to make a dessert that would be tasty, filling and most of all strictly vegetarian! I have to admit that I am not following the vegetarian diet that you have to obey during Lent, but one of our friends did and so did the priests that came to conduct the Holy Blessing.
And I made Halva with Semolina. A delightful, simple and quick dessert that goes well with coffee or tea.
As I previously said I am not good with sweets and desserts ... so please know that this recipe is highly adjustable and I mean on measures. I never count grams on this recipe, its all done on estimate based on how it looks to me... But here is a more "solid" version.
Semolina Halva with nuts and fruits
Ingredients
300 gr Semolina flour (all supermarkets have it by the flour or rice section)
a hand full of nuts - mixed hazelnuts, almonds and pine nuts
a hand full of dried fruit - orange peel and sultanas or raisins
a heaped tablespoon of cinnamon
some olive oil
Syrup
1 cup of sugar (brown sugar would give more of a caramelised taste)
2 tablespoons of honey
3 whole cloves (no.. not the garlic type!! the spice type!)
1 cinnamon stick
about a Litre of water
You need a big and deep pot for that!!! And a wooden spoon to stir. Turn on the heat to medium, if it is too hot it will burn the semolina too quickly and the Halva is destroyed.
Pour the olive oil just enough to cover the base of the pot.
Put the Semolina and the cinnamon first and start stirring constantly but gently. You do not have to beat the semolina, only swirl it around to get covered with the oil. The mixture should still look dry and not soggy.
In the meantime start your syrup. Add everything in a pot. You do not have to boil or reduce it, you only need to combine all the ingredients and infuse the spices in it.
After about 5 minutes and whilst you continue stirring gently, the Semolina should still look golden yellow and with no burnt patches. Now add the nuts and the dried fruit. The recipe can be done without the nuts or the fruit depending on taste, but I would highly recommend them both as they add texture and flavour.
After 2 more minutes you should smell the aromas of the dried fruit and nuts.
Now comes the tricky and dangerous part. As you would have imagined the Semolina and the rest of the dry ingredients would have developed a certain degree of heat ... So turn the heat OFF!!!
We need to add the syrup to the dry pot! Do it slowly and gently and do not get scared by the reaction.
The mixture will bubble and steam like a volcanic explosion!!!! Pour steadily the syrup whilst you mix with the wooden spoon and make sure that you scrape everything from the bottom of the pot. The Semolina will absorb every last drop of the syrup! If you feel that the mixture is too dry and stiff you can add some water and stir in the mixture. It should have the consistency of porridge.
Pour the mixture in a tray, cake tin or individual ramekins, depending on the shape you want to give
I find a round cake ring with a hole in the middle always looks good. Leave to cool and then turn the cake tin on a plate and you can cut perfect slices to serve. Sprinkle with some ground cinnamon and enjoy warm or cold!!
17 February 2010
The Salad of Salads!
Few weekends back we went to Athens and I was looking forward to some Greek food. That I got but I also discovered that in the effort of some restaurants to show something "different" they are willing to compromise tradition.
I want talk about The salad ... The food ... The legend!!
The most humble salads of all that was never missing from the table of a Greek house The greek salad!
I have seen it in so many versions some of them quite respectable some of them so badly made that the salad was screaming to be released from the fake name it had!
Famous chefs tried to recreate it too... That's when I have seen the innocent lettuce leaf appear!!! That's when I wanted to scream and say " lettuce is a winter veg!!! What are you doing adding it into a summer salad?" Obviously lettuce is cheaper and gives the salad more volume.... Restauranters don't want make it different... They want to make it cheaper.
Well to make things clear and seasonal here is the basic recipe of the Greek Salad. Some ingredients can be omitted to taste like onion or olives but adding others instead really does change the taste!
Greek Salad (for side dish for 4)
4 ruby red tomatoes not cherry if using cherry a punnet will do.
1 cucumber
1 red onion
a handfull of olives with stones preferably Kalamata
a block of feta cheese
olive oil
oregano
sea salt
quick splash of balsamic or red wine vinegar
flat leaf parsley
A nice generous bowl so everyone can share!
Chop the tomatoes at least in quarters. Try to buy the best tomatoes you can afford and if they are not ripe enough.. well leave the salad for the next day or after. Wash and peel the cucumber by leaving alternated dark green stripes, makes it prettier on the plate. Both tomatoes and cucumber go in the bowl
Chop the onion in half and rub it in your palms with some sea salt. My grandmother said that made the onion sweeter!
Then wash it of the salt and chop it in thin slices and throw on top of the tomatoes and cucumber. Add a pinch of salt now and mix as you do not want salt on your salty olives and feta cheese. Add the olives on top and then the block of feta. You can either cube it or leave it whole on top of the salad. Mix the olive oil with the oregano and a few drops of good quality red wine or balsamic vinegar and pour on top of the cheese and the rest of the salad. Chop your parsley and add a few leaves on top. You are good to go!! Do not forget the bread for some serious dipping in the salad bowl!!!!!
Enjoy!!!
Subscribe to:
Posts (Atom)